To make the corners of the garden sturdy I cut the timbers to interlock. Then I drilled a hole all the way through and hammered in a 36″ rebar pin. I did it the same way for the first half and it's worked out pretty well.
You can see again, I'm using newspaper to help keep the grass from growing up to the garden surface.
Originally I left the pins sticking out about 2 feet. I was using it to hold up my fencing material. I'm not doing that now so I hammered the pins in almost all of the way. I am going to leave a few inches in case I decide to add another level or two.
Tag Archives: gardening
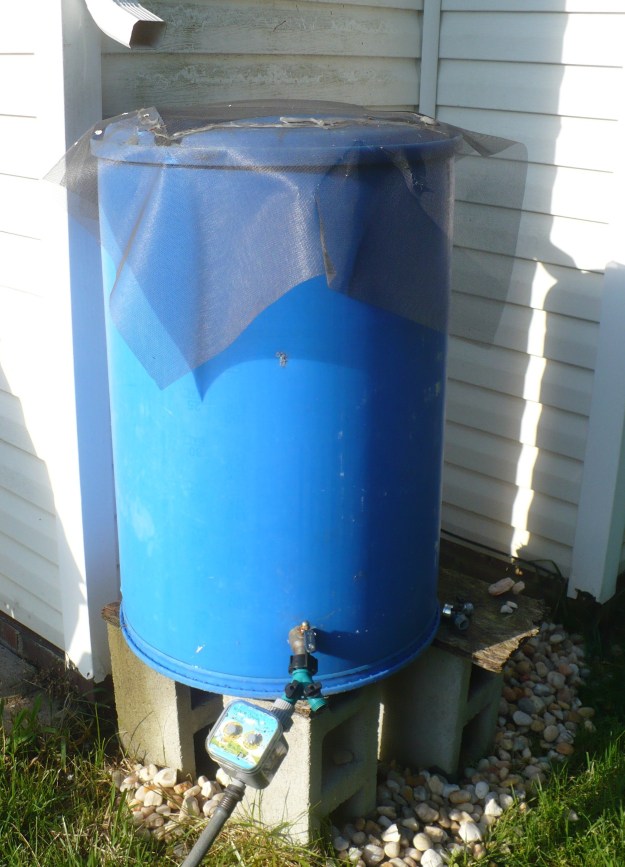
Automatic Timer for Rain Barrel
Since I had a rain barrel I wanted to add a little automation to it. The best time to water is early in the morning, before the sun has come up. of course, early in the morning I need to be off to work. To help me out I purchased an Automatic Water Timer and some soaker hose. After hooking it all up I was quite pleased with myself.
It took me a while to realize it, the automatic timer wasn’t working. It never actually came on. The problem was that I was testing it by hooking it to the house water line then, when it worked fine, I put it back on the barrel. Apparently (obviously now), there are two kinds of automatic timers. The kind that use the high pressure of city water lines to actuate and the kind I need for a gravity fed system.
When you get your own make sure it’s one that operates at 0 PSI, not just the kind that works with low pressure soaker hoses.
I ended up ordering a Solar Rain Barrel Timer online, which says it can operate at 0-80 psi. I couldn't find anything similar in any of my local hardware stores and this one seemed the best for the price.
Tillage
Obviously with the soil I have I'm going to need to break up my soil. The clay is pretty tough and unrelenting.
Before I plant I want to break up the top few inches of ground. This will do a couple of things. Destroy some of what's growing there now and mixing in the top soil that is available with the red stuff lower down. After I've done that I'll pour in some bagged top soil and mix the whole thing again. This should provide a good base to grow in.
I know from my experience working on the path that the ground doesn't break apart just by digging it up. A rake and a hoe aren't much better. The hoe still basically pulls up the ground in clumps. The rake is slightly better at tearing the ground apart but, it is still slow going; after several strokes I've still only scratched the surface. Given that I have over 90 square feet to do this isn't the best solution.
I have a couple of options for rotary Tilling. My father has a Ryobi tiller attachment that he has used for some time. I borrowed that but found it to difficult to handle with my soil. It was a workout just to hold it against the ground. I think I banged up a few of my bricks pretty well. It seemed to deal with the clumps of dirt on-top of the ground well enough. Perhaps it is better served mixing non-compacted soil.
I have another friend who has graciously offered to let me borrow his Craftsman rototiller. This worked much better for me. It is a walk-behind tiller, with the motor sitting right on the tines. It was a harder to maneuver in the raised beds but in Garden #2 it was easier. The ground was still wet from the rain two days before. The tiller bogged down more than I would have liked, but still manageable.
I mixed in about equal parts top soil and compost. I've mounded my potatoes.
Birth of a Garden
On Friday I purchased some landscape bricks for the front garden. Using the diagram I had created in AutoCAD I decided that I only needed to buy 55 bricks to go with the 12 I already had. I loaded up with my allotment of gray 12″ landscape bricks, nearly crushing my suspension in the process, and brought them home. Unfortunately the 12 bricks I already had were brown. Oh well, I'll just put the brown ones in the back, maybe nobody will notice.
As usually happens, real life is different than the virtual world. Luckily it worked out in my favor, after laying everything out I ended up with three extra bricks.
I had originally intended to lay them out to find their proper positions then level the ground and lay plastic sheets down and relay the bricks. After finally getting the bricks where I wanted them I decided that it would be too much work to take them all up and try to level first. Instead I found the bricks that seemed to be most un-even and leveled them out. I abandoned the plastic sheet altogether.
To combat weeds between the bricks I used the power of my terrible clay soil. I dug up some wet clay and proceeded to pack it in between the bricks. Forty-five minutes later, with my hands caked in mud I had finished. I think it will hold and hopefully nothing will ever grow there. Ever.
Between the beds I am laying a path. I will fill the area, a couple inches thick, with white pebbles. I don't want to have grass growing up here either. I removed the good grass in small sod pieces and planted them in the yard where needed. The rest of the top soil I shoveled over into the beds. Again, I'm hoping the quality of clay will prevent weeds from growing there as well. This leads to one concern though, puddling. My solution is to slope the path slightly towards the yard and a sump (composed of a bucket with holes in the bottom, filled with rocks) that I'm putting right where the two paths intersect.
I got the Lowes coupon I had been expecting on Saturday. In a few days I'll use it to purchase top soil and a few other odds and ends I need. I plan to add 2 inches of top soil to the beds and roto-til it in.